• Home
  • Portfolio
    • Work
    • Resume
    • Linked In
  • shop
  • Contact
    • about
    • send a message
    • Social
      • Linked In
      • Instagram
      • Pinterest

CINDY LACKEY

DESIGNER

Happy Weekend + Moderna Museet Stockholm


00_collage-happyweekend+mms


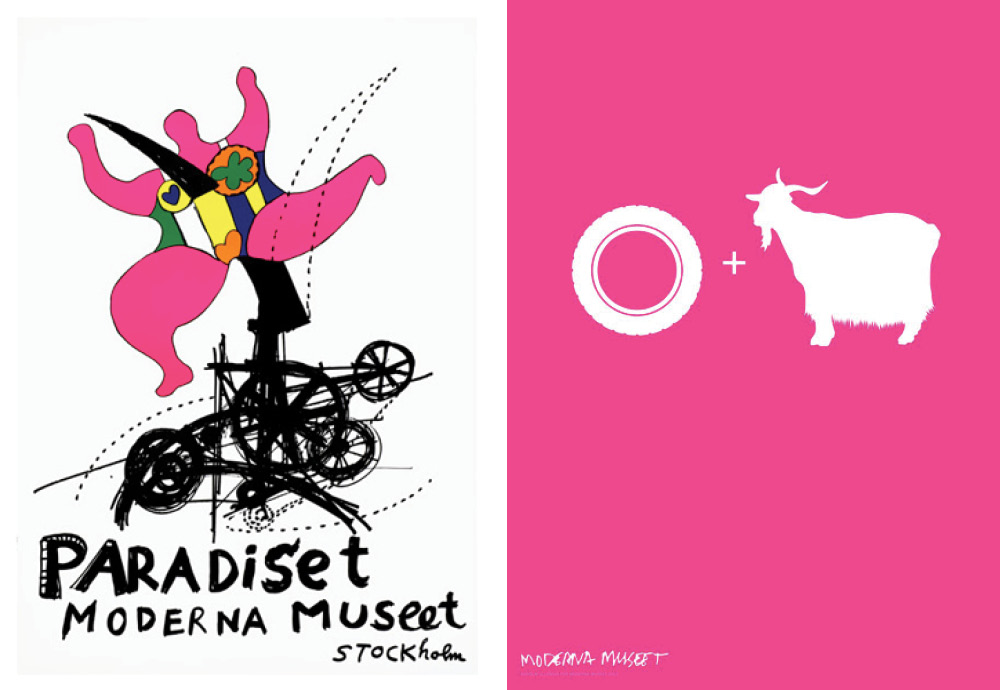
We visited the Moderna Museet during our trip to Stockholm a couple weeks ago. I love taking in a couple museums while I’m in new cities. This one was really great and you should definitely stop in if you’re in town. They also have a sister museum in my town of Malmö so some of the exhibits I had already seen, but I think it was still worth the trip.

Here is the secret: Sometimes the gift shop is as awesome (or more awesome) than the actual museum. All those amazingly great works of art and design that you just witnessed? They are available for affordable (and easily transportable) sale right there in the gift shop! This trip I picked up the vibrantly pink poster on the right, aptly titled Goat + Tire and based on this work of art. The also awesome work on the left can be found here. Now, it’s time for a trip to IKEA to pick up the frame.

Have a happy weekend!

Copper Triangle + Ikea Malm Dresser Hack

xx_final

I am so excited to reveal this super easy Ikea Malm Dresser hack I’ve been thinking about for ages now. Our dresser got a little banged up during its trip over the Atlantic which gave me the perfect excuse to get crafty on it.

You know I’m addicted to copper and I love how the tone is reflected in the Rand McNally world map tacked right above. It also repeats the copper in the Ikea hacked Ekby Gällö shelves and in our desks (to be revealed soon!).

This diy is so easy, it’s all about the contact paper and keeping clean lines.

02_materials


Materials:

Malm dresser from Ikea

2 rolls copper contact paper (buy um both at the same time. I didn’t and I have slight color variations that I have decided are now part of the look)

construction paper or scrap template making paper

cutting board

straight edge

xacto knife

masking tape

03_tomake-top

Make sure to dust and clean everything really well. I was able to re-position a few times with out too much of an issue. Try to avoid creasing the paper, though, it has a foil quality. Remove the backing and smooth the contact paper as you go. Check the backing for more instructions on how to adhere the contact paper cleanly.

For the top, adhere the contact paper at the side edge of the dresser top keeping the long edge of the contact paper flush with the back of the dresser. You will need to runs to cover the top, just but them together. The seam should blend with the grain of the contact paper. (My seam is so clearly noticeable in the photos because I didn’t buy my contact paper all at the same time and there is a color variation. It’s not that noticeable in the rl so I let it be)

Make a good hard crease at the edge and front of the top. After I was done some bubbles popped up right along the edge. I very carefully ran my xacto knife along the edge to create a clean score then pushed the bubbles out as cleanly as I could. It’s still not 100% profess (see the pic above) but the shine actually helps hide a lot of the bubbling at the corners.

03_tomake-triangles

I made a couple templates out of construction paper and stuck um to the dresser with masking tape so I could play with a few triangle sizes. Then I used the final template to cut the contact paper triangles. I just cut my nails so I used masking tape to help me get the backing off the contact paper. And they just stick on like the top. Easy as pie!

04_done-diptic


04_done

The metallic contact paper has such a great shine. I love the Africa meets mod meets Southwest feel. Cheers!

DIY + Paper Plane Wall Mural

01_OPENING TITLE

I am so excited to show you all our guest room! We have our first round of guest coming to stay really soon so this room gets pretty high priority on my To Do list. I wanted this room to have a cool boutique b+b vibe. What could be more hip than a geometric wall mural?

02_Before-BlankWall-BWt

We started out with some basic furnishings from Ikea, including this awesome geometric light shade from their temporary collections. I think this guy might inspire a few more projects here in the future, so look for that.

I couldn’t just let that big blank wall stand empty for long. And, since we’re renting, I am trying to not paint any walls (but stay tuned). Masking tape or washi tape is the perfect solution. I found a few rolls for cheap at the local Lagerhus in my favorite, GOLD!

02_Materials+Constructiont


SUPPLIES LIST:

– 2 rolls of gold masking tape, 15mm x 10m (I used about 1 and 3/4 rolls and my canvas/wall is 2.45m x 2.80m)

– 45/90 plastic drafting triangle (or adjustable drafting triangle for precise angle measurement, though my angles are suggested and rough)

– laser level

– T-pins

– x-acto knife (and metal straight edge)

– sissors

– white erase (to clean up smudges from the gold tape)

03_Template_CONST1t

Start by making a 60° equilateral triangle. I positioned my triangle at an angle to the ceiling line for more drama. Stick your T-pin in your start point and position your laser level just beyond your second point. Look for the glint of the laser line on the pin and secure your laser level with T-pins. Run the masking tape along the laser line keeping the top or bottom edge straight to the line. Over shoot the line on both sides (we’ll come back later and clean up all the connection points with the x-acto knife).

Measure 60° and move the laser level to position 2 and place line 2, overshooting the points again. Connect lines 1 and 2 with line 3.

03_Template_CONST2t


Move the laser level as before to create the next three lines (including one extending beyond your triangle but not inside). Trim the section of your triangle as shown. You can lay your straight edge on the tape your keeping exposing the to be trimmed portion and slice lightly. Any cuts will be masked by the shadow of the tape and shouldn’t do more damage to your wall then pin holes would.

03_Template_CONST3t


Connect the points to create the “cockpit” of the paper plane.

03_Template_CONST4t

Clean up any overshot lines into nice angles and use the eraser where any smudges happened.

Hint: One point on my plane started to curl up after the first night. I just gave it a hard “you know who’s boss” mash into the wall with my fingernails and we haven’t had any incidents since. 

04_Triptict

If flying isn’t your thing, I think this would work really well for birds, boats and gems, too! Isn’t geometry fabulous?

Duvet Cover + Pillows | Bed Frame

Ikea Hack + Ekby Gällö Shelves

title-collage1

Well, hello there. I’ve taken a little Spring break from this blog to finish setting up house. But now it’s time to show you all when I’ve been up to!

Everyone loves a good Ikea hack so for our fist post back here is my hack of the Ekby Gällö / Ekby Tryggve shelving system.

IMG_6631_mod

I’ve always dreamed of having a full wall of shelves to display all my books and things. I was inspired by the look of the Eames House bookshelves with all their quirky collections displayed for the world. I’ve been seeing a lot of leather strap bookshelves trending, and I like the natural rustic look but I wanted something sturdier. Oh and you have to check out this awesome upside down shelf DIY from Mandi at Vintage Revivals. She’s so awesome.

When I spotted these Ekby shelves at Ikea I thought they looked kinda like ropes wrapped to hang the shelves and I like that they make that geometric triangle at the top (which also comes in handy for resting books against). But the white is so boring the whole bracket gets lost on a white wall. You know I am so obsessed with metallics and with a bit of copper spray paint those geometric details are ready to shine!

IMG_6644_mod


What I Used:

(Please note that what you use will very depending on wall type. Please consult your local hardware store to pick out what tools will work best for your install)

– Ikea Ekby Gällö / Ekby Tryggve shelving system (I installed (8) 119cm x 29cm deep bracket supports and (12) matching plain wood shelves)

– 16 heavy duty Molly Bolts (2 per bracket support) for your wall (our wall was double thick gypsum)

– Molly Bolt setting tool (for smashing in the bolt super well with the cutest little bird face! See the image below. I made him talk with a little bird voice while B did all the heavy drilling work. I recommend keeping your drilling buddy entertained similarly)

– Drill + Bits (for your wall and bolt size)

– Stud Finder (with electrical detection)

– Laser Level

– Measuring Tape

– Copper Spray Paint (I used 1 1/2 can of 600ml) (edit: Krylon also makes a great general purpose metallic spray paint)

– Martha Stewart Multi-Surface Metallic Acrylic Craft Paint in Copper (for touch ups) (edit: link)

tools-collage1

For the hanging part: Follow Ikea’s directions and rely heavily on your helpful hardware store man. We made at least 4 trips to our local hardware store and the Clas Ohlson to make sure we had all the correct supplies for our install. We hung our brackets within 70 cm of each other in order to create a stable span of the 119 cm length of each board safely as per the Ikea instructions. Measure twice and drill once to avoid filling a lot of holes or having your whole beautiful wall tumble to the ground.

spray-collage1

For the spraying part: Make yourself a nice little spray area out side for all the bracket supports. We just moved so I had quite a bit of boxes and packing material on hand and just used that. I made sure to keep all the pieces as close together, without touching, so I wouldn’t waste too much paint.

Now, I can not say this enough: spray paint in a well ventilated area! Use a mask and gloves because the metallic paint can really irritate your hands and throat (note my pre-gloved hand 2 minutes before it started itching like crazy). As with all painting, I recommend 3-4 light coats. It takes longer but you won’t get big drips. Patience is a virtue. Try taking chocolate breaks between coats, I think it helps.

The paint took about 24 hours to totally cure, which I found out the hard way when I tried to carry all the pieces back upstairs after they had only dried for an hour. Oops. This is where the MS metallic paint comes in handy. After 72 hours the paint is fully cured (but check your spray can for specifics!).

IMG_6635_mod

I expect the item layout to be pretty fluid but I think this is a good starting point. It drives my dear best friend (with her masters in literature) completely nuts that I’ve arranged our books haphazardly by subject (ish) and color, but I love it! And as long as I know where to find everything, it’s cool right?


IMG_6636_mod

I am so totally in love with how this project turned out! It’s really got this great American Southwest cabin retreat vibe. It completely anchors the whole living room as the focal wall, diverting attention from our overwhelmingly large cat tree (the focus of our last apartment’s living room) and the flat screen TV. All our games are within reach for when company stops by or we get board on Sunday night.

IMG_6624 copy_mod

Stay tuned for more Ikea hacks in this room and the full house tour still to come. I can’t wait to show you everything I’ve been up to!

about

Hello! I’m an interior, user experience, and graphic designer with a love for purpose-driven minimalism. I am also a digital nomad originally from California, currently living in Barbados, by way of Colorado, with my husband and our two cats.

FOLLOW ALONG

  • Instagram
  • LinkedIn
  • Pinterest

just what you’re looking for

© Cindy Lackey | Site design handcrafted by Station Seven